Back to RPCEmu Networking Guide
Windows - Ethernet Bridging
Known Issues
- You may need to disable Windows Firewall or other third party firewall software
- You may not be able to bridge with a Wireless network, this all depends on various hardware support from your wireless network card.
- On Windows XP the full configuration of the Bridge Interface is not remembered across reboots of the Host operating System. Delete and recreate the bridge interface on each reboot if need be.
- On Windows Vista and later (7, 8, 10) you need to perform additional configuration steps to enable 'weakhostreceive/weakhostsend'. Details below
- If you have upgraded from Windows 7 or 8 to Windows 10, you will need to uninstall and reinstall the TAP driver. This is due to a bug in the upgrade where the identifer to the Adapter was lost.
- On Windows 8/10 you need to perform additional configuration steps on the windows network bridge. Details below
Introduction
The following screenshots and configuration are from Windows XP. If you use Windows Vista, 7, 8 or 10 then these will likely not be identical but will be similar enough to be useful.
Install TAP driver
Windows does not have a 'TAP' driver built in like Linux, so you must install one provided by the OpenVPN project.
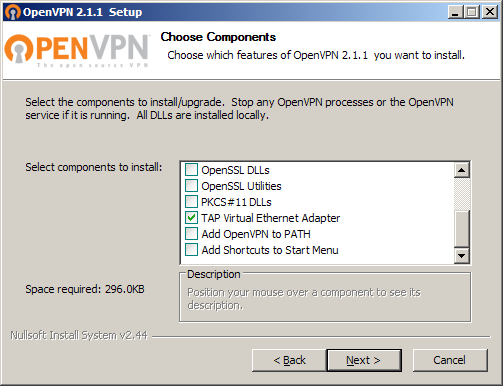
Download the OpenVPN client Windows Installer, and run the installer (the guide was tested with v2.1.1, v2.1.3 and v2.3.8). We only need to install the 'TAP' device, so only select that from the installer.
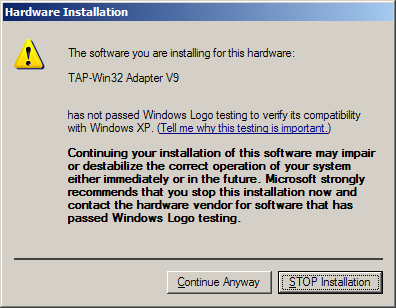
Installing the driver may pop up a dialog box about installing an unsigned device driver. RPCEmu requires this driver to do networking.
Rename TAP Interface
Find the newly created device in Control Panel -> Network Connections and rename the device (it will likely have been created with the name 'Local Area Connection (Highest number)', I recommend renaming to 'rpcemu' (all lower case).
Configure TAP Interface
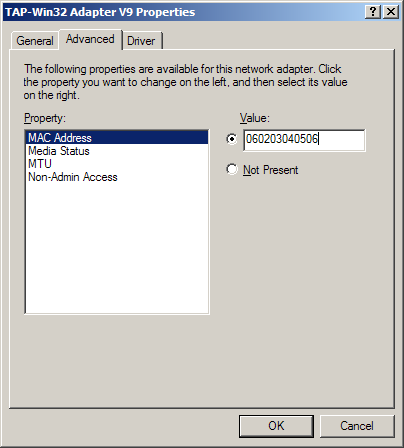
Right click the 'rpcemu' TAP interface and select 'Properties' click on the 'Configure' button and then select the 'Advanced' tab.
Set the MAC Address variable to '060203040506'.
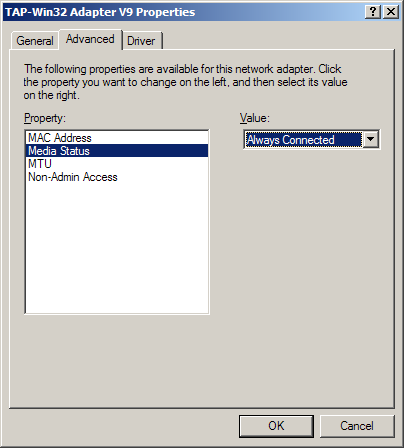
Set the Media Status to 'Always Connected'.
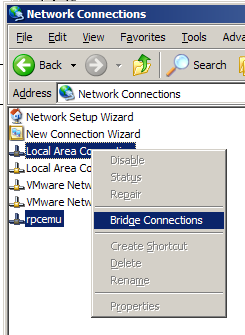
Bridge Connections
In the Control Panel -> Network Connections window, select both the 'rpcemu' interface and the interface you wish to bridge it with e.g. 'Local Area Connection' (using ctrl-click to select multiple). Then right-click and select 'Bridge Connections'. When you bridge the connections you will probably see all of your computers network connections to other machines close down, and networking will return after a short delay.
On Windows XP the full configuration of the Bridge Interface is not remembered across reboots of the Host operating System. Delete and recreate the bridge interface on each reboot if need be.
Windows Vista and later (7, 8, 10) Additional configuration
You need to configure Windows Vista and later to behave in a manner more similar to Windows XP with regard to packet forwarding over the Network Bridge interface.
You will need to run the following commands as 'Administrator' on the command line (if necessary create a shortcut to 'cmd.exe' and then right click that shortcut and select 'Run as Administrator').
First discover the interface number of the Network bridge interface:
netsh interface ipv4 show interface
You should have output similar to this, the number is the Idx of the 'Network Bridge' Interface, in this case it's 17. On Windows 8 or 10 this may be called 'Ethernet'.
Idx     Met         MTU          State                Name
---  ----------  ----------  ------------  ---------------------------
  1          50  4294967295  connected     Loopback Pseudo-Interface 1
 17          20        1500  connected     Network Bridge
Then enter the following 4 commands, altering the number to the Idx of the 'Network Bridge' interface discovered above.
netsh interface ipv4 set interface 17 weakhostsend=enabled
netsh interface ipv4 set interface 17 weakhostreceive=enabled
netsh interface ipv6 set interface 17 weakhostsend=enabled
netsh interface ipv6 set interface 17 weakhostreceive=enabled
Windows 8/10 Additional configuration
On Windows 8 and 10 a new model of bridging has caused an issue with the MAC addresses assignmed to network interfaces. You can verify this by running PowerShell and issuing the 'Get-NetAdapter' command.

As you can see in the above screenshot, the Network Bridge (Ethernet) has the same MAC address as one of the two parts of the bridge. This will not work.
To resolve this we assign a different MAC address to the Network Bridge adapter. Open Device Manager. Control Panel->System->Device Manger.
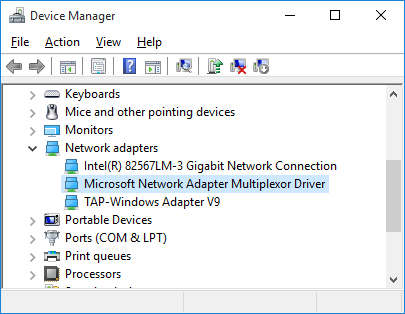
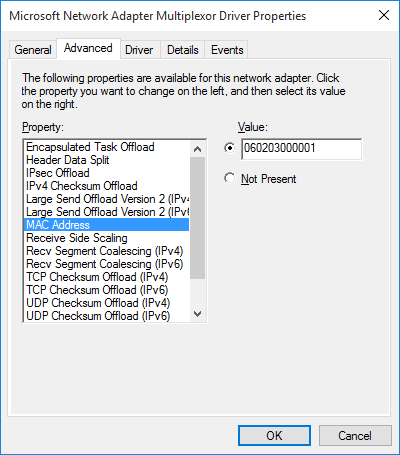
Find the 'Microsoft Network Adapter Multiplexor Driver' adapter in the 'Network adapters' section and right click, open 'Properties' and click 'Advanced', Find the MAC Address setting. Assign it a value, here I used 060203000001.
After clicking OK, you can confirm the setting was accepted by again running the 'Get-NetAdapter' command in PowerShell.

RPCEmu Configuration
Run RPCEmu and open the networking configuration GUI (on the main menu, Settings -> Networking).
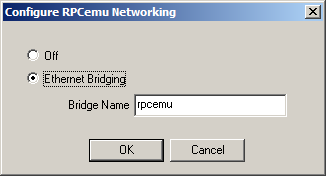
Select the 'Ethernet Bridging' option, Set the bridgename to be the same CASE SENSITIVE name of the TAP driver configured earlier ('rpcemu'), and click on OK. RPCEmu will reset and RISC OS will restart.