RPCEmu User Manual
RPCEmu is a emulator of Acorn's Risc PC and A7000 machines. It is a work in progress and should be considered of Alpha Quality.
- Features
- Performance
- Installation
- ROM Images
- The Mouse
- The Menu
- Using floppy disc images
- Using hard disc images
- Using HostFS
- Using the CD-ROM
- Networking
- Printing
- Large screen modes
- Finding Help and Reporting Bugs
Features
- Emulates the Acorn Risc PC with an ARM610, ARM710, StrongARM processors and experimentally the ARM810
- Emulates the Acorn A7000, and experimentally the A7000+ and Risc PC2 (Phoebe)
- CPU performance greater than real Risc PC hardware on current PCs
- Up to 256 MB RAM
- Up to 2 MB VRAM, 8MB if the OS supports it
- Full video emulation, supporting all video modes
- 16-bit sound emulation
- Emulates two floppy drives
- Emulates two IDE hard disc drives
- Can emulate an IDE CD-ROM drive
- HostFS allows access to host file system from RISC OS
- Networking support
Performance
Most PCs made since 2010 should be able to deliver performance similar to real Acorn hardware.
RPCEmu reports how many millions of instructions are executed per second (MIPS). This figure has been widely misinterpreted in the past, partly due to Acorn giving their machines very optimistic performance figures, and partly due to confusion with the DMIPS figure reported by the Dhrystone benchmark.
It is better to compare RPCEmu and real Acorn hardware running actual applications or benchmarks, instead of comparing RPCEmu's MIPS count with what an ARM6 or ARM7 is theoretically capable of.
Installation
Windows
Download the .zip file and install it to a location of your choice.
Linux and FreeBSD
The Linux and FreeBSD versions are provided as source code; as such it must be compiled before use. Please refer to the Linux compile instructions or FreeBSD compile instructions.
ROM Images
RPCEmu requires a RISC OS ROM image to work, please refer to these instructions for details on how to acquire them.
The Mouse
RISC OS uses a three-button mouse, if your host machine only has two buttons the right and left buttons are mapped correctly, with the middle 'menu' button accessible via the windows menu key (to the left of right ctrl key).
On Linux hosts pressing both left and right mouse buttons simultaneously will generate a middle button click (depending on X server configuration).
Two-button Mouse Mode is available from the Settings Menu; it swaps the right and middle mouse buttons, allowing the more common RISC OS use of Select and Menu on two-button mouse systems such as laptops.
The Menu
RPCEmu contains a menu to access most of the configurable aspects of the program.

- File
File -> Take Screenshot... - Save the current display of the emulator as a PNG image to your host machine.
File -> Reset - Hard-resets the RiscPC. You will lose all unsaved work. Don't use during an IDE hard disc operation, or your disc image may be corrupted! ('Bad Directory' errors and the like).
File -> Exit - Exits RPCEmu.
- Disc
Disc -> Floppy -> Load Drive :0 - Loads a floppy disc image into floppy drive :0
Disc -> Floppy -> Load Drive :1 - Loads a floppy disc image into floppy drive :1
Disc -> CD-ROM - various options for the CD-ROM emulation.
- Disabled - Disabled disables all CD-ROM functions, and must be selected if you want to use two hard disc images.
- Empty - Effectively 'ejects' a disc image provided by the ISO Image option or Direct CD Access.
- ISO Image... - Use a .iso CD image file for the CD-ROM. Use the file dialog box to select the file.
- Direct CD Access - Directly use the host's CD-ROM drive.
- Windows - RPCEmu will add entries to this menu for each available CD-ROM drive, for example "CD-ROM Drive D"
- Linux - The menu entry "Host CD/DVD Drive" will read the CD-ROM drive using the
/dev/cdromdevice.
- Settings
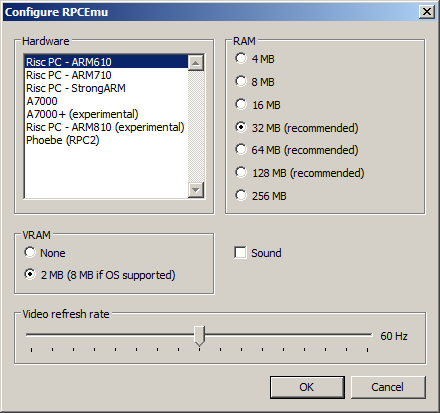
Settings -> Configure... - Opens the configuration window. The options here are :
- Hardware
Choice of Risc PC, with various processor options, A7000, A7000+ and Phoebe models. ARM810 support is experimental and very poor. A7000+ ARM7500FE currently offers no floating-point performance advantage over A7000 ARM7500
- RAM size
Choose from 32 MB to 128 MB. 4, 8 and 16MB are less stable due to RPCEmu TLB bugs. 256MB is less stable due to RISC OS bugs.
- VRAM size
Choose none or 2MB VRAM. With Hardware set to A7000 or A7000+ this choice will have no effect. If you set 2MB and the OS is supported then this will automatically patch the ROM to use 8MB VRAM.
- Sound enable
- Video refresh rate
Choice from 20 Hz to 100 Hz. Default is 60 Hz. Lower values will speed up the emulator, but the video will obviously become more jerky and this may have an impact on games and demos that base their timing on this. For many older games it is best to set this to 50 Hz.
Settings -> Networking... - Please see the Networking Section for more details.
Settings -> Full-screen Mode - Puts RPCEmu into full-screen mode. Press CTRL+END to return to windowed mode.
Settings -> Reduce CPU Usage - Attempts to reduce the host CPU usage of RPCEmu when RISC OS is idle. Requires at least RISC OS 3.60 and does not take effect until roughly 30 seconds after RISC OS has started and RISC OS is not busy.
Settings -> Follow Host Mouse - RPCEmu uses a hack to make the RISC OS mouse pointer follow the native pointer. In many games this does not work, so disable this to turn it off. Disabling this enables 'Capture' mouse mode where the pointer will be constrained within the emulators display, click in the window to capture the mouse, and press CTRl+END to release the mouse.
Settings -> Two-button Mouse Mode - Swaps the right and middle mouse buttons, allowing the more common RISC OS use of Select and Menu on two-button mouse systems such as laptops
- Help
Help -> Online Manual - If connected to the internet, this opens a browser window to view this online manual.
Help -> Visit Website - If connected to the internet, this opens a browser window to visit the RPCEmu homepage.
Help -> About RPCEmu - Displays information about this version of RPCEmu and displays copyright and licensing information.
 |
Enable or disable the emulated machine's sound output.
Using floppy disc images
RPCEmu supports three different floppy disc image formats, ADF, ADL and IMG. A disc image is a file on the host machine that contains the contents of a floppy disc.
You can select which disc image to use on each drive by using the UI provided on the 'discs' menu.See above.
An ADF disc image is a RAW binary dump of a RISC OS ADFS D, E, E+, F or F+ formatted disc. ADF disc images should be 800KB or 1600KB in size and have a file extension of .adf
An ADL disc image is a RAW binary dump of an Acorn ADFS L formatted disc, this works in RISC OS and also was compatible with the earlier versions of ADFS on the BBC Master series, etc. ADL disc images should be 640KB in size and have a file extension of .adl
An IMG disc image is a RAW binary dump of a MS DOS FAT formatted disc. IMG disc images should be 720KB or 1440KB in size and have a file extension of .img
RPCEmu supports up to two high-density floppy disc drives, :0 and :1 with one configured by default :0.
If you wish to configure two drives in RISC OS, use the following command or use !Configure to add them.
*configure floppies 2
Using hard disc images
Up to two IDE hard disc files can be used (only one if a CD-ROM is used). They are called hd4.hdf and hd5.hdf in the program's working directory. Pre-formatted hard drive files are available from the website.
Once the hard disc image is in place you can copy the boot sequence from floppy, CD-ROM or HostFS. To get RISC OS to boot off hard disc, type the following commands at the command prompt:
*dir adfs::4.$
*opt 4,2
*configure filesystem adfs
*configure drive 4
*configure boot
It is possible (though not recommended) to prepare and format your own hard disc files. If you wish to try this, take note of the following:
- The hard disc must currently always have 63 sectors and 16 heads
- The number of cylinders can vary. The default gives the maximum 32gb hard disc size. When formatting, this figure should generally be double the desired size in megabytes.
- Never run a long soak test on the hard disc - this does not work!
Using HostFS
HostFS allows you to use a directory on your host operating system as a RISC OS drive. This allows you to more easily move files between the host OS and RISC OS than either Floppy disc imanges or Hard disc images provides.
HostFS always reads from the hostfs directory. Filetypes are represented as a 3-digit hex number after a comma, or a pair of load/exec addresses.
You can use HostFS as main bootable drive within RISC OS by issuing the following commands:
*configure filesystem hostfs
*configure boot
Using the CD-ROM
RPCEmu provides two methods of accessing CDs from RISC OS: ISO images and direct access to the host's CD-ROM drive.
You may need to configure RISC OS to have a CD-ROM drive. If you use a CD-ROM drive you may only have one HDF hard drive file. Use !Configure or use the following.
*configure cdromdrives 1
Use the settings menu described above to access CDs.
Networking
Networking is available on the Linux and Windows platforms, please see the RPCEmu Networking Guide for details.
Printing
RPCEmu does not support direct printing from RISC OS (there is no parallel port emulation or pass-through to the host parallel port). So the recommended method of printing is to install PrintPDF, print your documents to PDF files, copy them to your host operating system via HostFS and print them there.
Large screen modes
Warning: DO NOT DO THIS ON REAL HARDWARE it could damge it
RPCEmu can provide up to 8MB of video RAM (VRAM). This enables you to use higher resolutions and more colours than actual hardware.
You will need to do the following:
- Enable more VRAM.
- Alter the video bandwidth limits
- Optionally, use a better MDF (Monitor Definition File)
1. Enable more VRAM
On the Settings->Configure window, make sure a Risc PC hardware model is selected and that VRAM is set to 2 MB (8 MB if OS supported).
2. Alter the video bandwidth limits
You need to alter the amount of data that RISC OS is allowed to send to the Video chip. This is controlled by a setting in !Boot.
Edit the file in !Boot. This could be in one of several places depending on which version of RISC OS is in use.
Check the following files:
- !Boot.Choices.Boot.PreDesk.Configure.!Run
- !Boot.Choices.Hardware.Blank.Boot.PreDesk.Configure.!VIDC
The file should have a line that looks something like this (with either 3, 4 or 5 number fields):
/<Obey$Dir>.BandLimit 38000 76000 152000 80000
Alter the numbers only, adding one zero to each number field:
/<Obey$Dir>.BandLimit 380000 760000 1520000 800000
Save the file and reboot RISC OS.
Note, do not be tempted to add more zeros as this will not work (this appears to overflow a calculation by RISC OS).
3. Optionally, use a better MDF (Monitor Definition File)
This MDF contains mode definitions for most historical RISC OS modes and new modes for most common LCD panel sizes that are in use today.
Copy the MDF to the directory !Boot.Resources.Configure.Monitors then use the !Boot Screen settings to choose this monitor and desired default screen mode.
Finding Help and Reporting Bugs
If you have any questions or need help, there is a RPCEmu Mailing List, however please specify the version number to avoid confusion. Your patches, suggestions and even bug reports are gratefully recieved.
Contributions: Matthew Howkins, Peter Howkins, Sarah Walker.