Back to RPCEmu Networking Guide
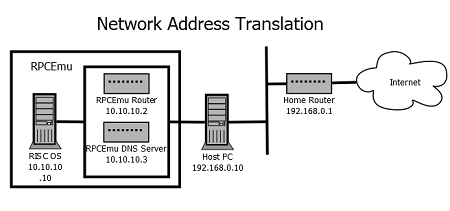
RISC OS Configuration - Network Address Translation
Protocols and Applications tested and working
- DHCP - If your version of RISC OS supports DHCP (Select, Adjust, 5 and 6) then you can use it to make setting up networking even easier
- HTTP/HTTPS - Browse, Netsurf, Oregano, Fresco
- FTP client (in passive PASSV mode) - FTPc
- Telnet - Freeterm
- Package Management - !Store and PackMan
Caveats - Network Address translation is simpler, but less featureful than other modes of networking, but will be suitable in almost all circumstances.
- ICMP packets are not forwarded through the Network Address Translation, only IP packets, as such 'ping' will not be able to ping any host other than 10.10.10.10 and 10.10.10.2
- Network Address Translation is effectively adding a network router between your host PC and the RISC OS machine. Just like the Network Address Translating router on a home internet connection this means it difficult to access services on the inside of the network from the outside. This means connecting to servers running in RISC OS is not currently possible. In future 'port forwarding' may be added to RPCEmu to allow this to work.
- ShareFS does not work, as it is not an internet routable protocol. Due to a combination of lack of port forwarding, mentioned above, and the way in which ShareFS does device discovery via broadcast packets.
Run RPCEmu and open the networking configuration GUI (on the main menu, Settings -> Networking).
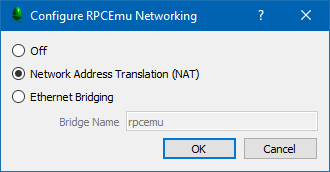
Select the 'Network Address Translation' option and click on OK. RPCEmu will reset and RISC OS will restart.
We now configure RISC OS to use the network we've just set up.
The IP addresses we use here, remain the same regardless of the host OS configuration and will not need to be changed should the host network change (e.g. wifi etc).
These screenshots are from RISC OS 5.24, other versions of RISC OS will be very similar but not necessarily identical.
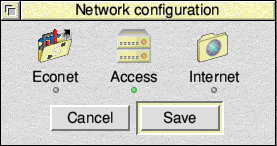
Run !Boot, to run the configure app, and click the Network icon:
Click the Internet icon:
Click Enable TCP/IP Protocol Suite, then click the Interfaces icon.
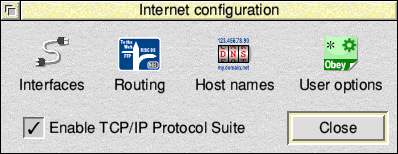
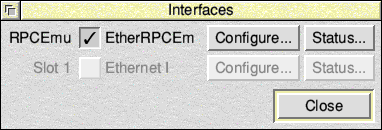
In 'Interfaces' make sure EtherRPCEm is selected and click the Configure... button.
If you are running a version of RISC OS that supports DHCP (RISC OS Select, Adjust, 5 and 6) then you can optionally use that to simplify things, and follow the Blue instructions otherwise you can use a static IP address and use the Yellow instructions.
START OF DHCP INSTRUCTIONS
Choose DHCP; and Click Set.
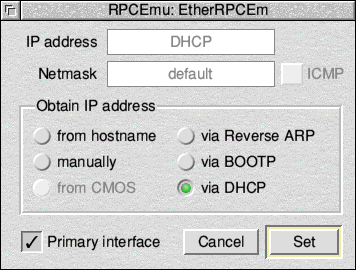
END OF DHCP INSTRUCTIONS
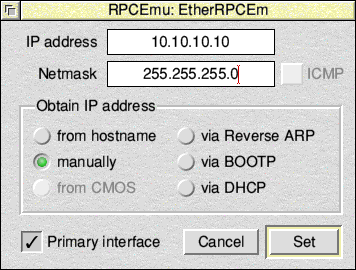
START OF STATIC IP INSTRUCTIONS
Choose Manually; and in IP address enter 10.10.10.10. In Netmask enter 255.255.255.0. Click Set.
Click Close on the 'Interfaces' window.
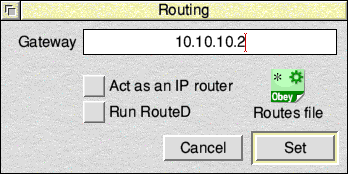
Now click the Routing icon in the 'Internet Configuration' window:
Enter the Gateway as the IP address of the NAT router. 10.10.10.2 Click Set.
Now click the Host names icon in the 'Internet Configuration' window:
DNS configuration: You must enter a value for Host name and Local Domain for RISC OS DNS to work, though the exact values are not important. This example uses the values myhost and domain. Enter Primary name server as the IP address of the RPCEmu NAT DNS server 10.10.10.3
On RISC OS 5, you may need to click the Try name server too box before several of the boxes become editable.
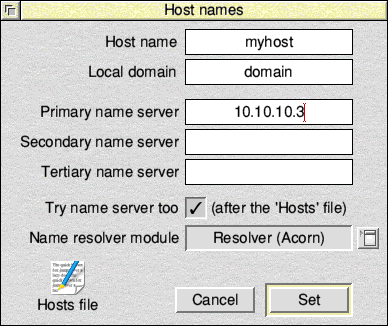
Click Set on the 'Host names' window.
END OF STATIC IP INSTRUCTIONS
Click Close on the 'Internet Configuration' window. You will be prompted to reboot RISC OS and must reboot before networking will be available.
Test configuration
Enter these commands at a RISC OS command prompt.
First check that the interface has been created:
ifconfig -a
This should have a rpcem0 interface in the output with the IP address we set earlier, 10.10.10.10.
lo0: flags=8049<UP,LOOPBACK,RUNNING,MULTICAST> mtu 16384
        inet 127.0.0.1 netmask 0xff000000
rpcem0: flags=8863<UP,BROADCAST,NOTRAILERS,RUNNING,SIMPLEX,MULTICAST%gt; mtu 1500
        inet 10.10.10.10 netmask 0xffffff00 broadcast 10.10.10.255
        ether 06:02:03:04:05:06
Next try to ping the router we're using.
ping -c 4 10.10.10.2
Next try a 'gethost' to test the DNS configuration.
gethost <a website that you know is up right now, eg. www.marutan.net>
The results should have the IP address of the site in. E.g. 185.71.36.186
Hostname: marutan.net
Alias:    www.marutan.net
Address:  185.71.36.186
   type:  2
 length:  4
If this all succeeded then networking has been set up successfully.